Showing posts with label MS Office. Show all posts

Weather forecast in Microsoft Office Outlook 2013 Calendar

Wednesday, June 19, 2013 by Tan
Welcome to Microsoft Office 2013. Have you guys used it yet? I am sure most of you might have used it already. How are you feeling after using the latest version of MS Office? Well, I am very happy with it as of now.

One of the features that I found great and was missing in the earlier versions of the Microsoft Office Outlook is Weather forecast in the Outlook Calendar. It looks like this:


When you open the calendar in your Microsoft Office Outlook 2013, you will find this weather bar, where you can see the weather of today and forecast for the next two days, as default. Check it out, if you have not seen it yet.

You can add new locations, based on your needs and can select anyone at one time. Every time you open calendar in Microsoft Office Outlook 2013, you will be able to see the weather bar. Apart from the maximum and minimum temperatures, it also tells you about the Average Wind Speed, Humidity, and Precipitation and, whether the day will be cloudy, sunny and rainy or anything else. I quickly set it to the city I stay in and it gives me the information quickly.

However, one thing I could not get at the first attempt was to change the temperature units – degree Fahrenheit (which is default) to degree Celsius (which we follow in our country). After going through a few trial and errors, I got to know how to change the temperature units from degree Fahrenheit to degree Celsius. So, here are the steps that you can follow to do so:


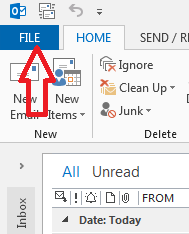
In Microsoft Office Outlook 2013, click on File.


Now, choose Options from the drop menu.


Then, click on Calendar in the Outlook Options window. Once you are in the Calendar options, scroll down to the extreme down where you will find the sub heading ‘Weather.’ Here, you can choose which temperature unit is to be displayed - degree Fahrenheit or degree Celsius.


You can also disable the weather on your Microsoft Office Outlook 2013 Calendar here, but that would be little foolish to do – even if you do not use it, why not keep it there, in case you need it sometime, for a quick update or such…

Hope you liked this. Let us know, if you got benefitted by this article.

Cheers!
Posted in Labels: , , | 0 Comments »

How to open MDI or TIFF files using Microsoft Office Document Image Writer?

Tuesday, February 14, 2012 by Tan
Hello mates,

It has been long time since I logged in here and wrote something that can be useful to the world. Hope everything is going great with you and your friends and family. With me, everything was going fine, until recently, I ran into a problem with my computer. I had a file with the extension MDI and I was not able to open that file to view it. It was a picture file and I had some serious business with it, but my computer would not let me open it.

I did some good research on this topic in Google and could, at last, find a way to open and view the file. My job was done all right, but I wanted to share this with you too, so that it helps should you run into such a situation and know not what to do.

Excuse me for not writing this any earlier, for I have had this issue some time back. However, now I am in mood and this is the reason, I am writing or rather describing the way I got it resolved. Hope it helps you too.

Well, to open MDI or TIFF files in your computer, you would need Microsoft Office Document Image Writer, a print driver included in the Microsoft Office suit itself, unless you have any other software to view these files. Microsoft Office Document Image Writer print driver is a part of Microsoft Office Document Imaging, in the office suit and it should get installed when you install the office suit entirely. Many of us install the suit in typical mode or in custom mode and fail to include this ad on. This is when you might run into the problem of viewing MDI and/or TIFF files.

I will tell you how to enable or install Microsoft Office Document Image Writer print driver in your computer, but let me tell you first what these MDI or TIFF files are.

Microsoft Office Document Imaging or MDI Format is a high resolution, tag-based graphics format which is used for digital graphics. At times, when you scan a document, it might get saved in this format.

TIFF or Tagged Image File Format is again, a high-resolution, tag-based graphics format which is used for the exchange of digital graphics, mostly in black and white, globally.

So, to open and view these high resolution image graphics files, you would need Microsoft Office Document Image Writer print driver installed in your computer, unless as I said earlier, you have some other software to do so. To install Microsoft Office Document Image Writer print driver in your computer, you may do the following things in order:

Note: I am using Microsoft Office 2007 version in a computer running on Microsoft Windows XP (SP3), and hence, the screenshots would tell you the same…

Step 1: Go to the Add or Remove Programs in the Control Panel of your Windows XP PC. You can press Windows Key and R together to open Run window and there, type control and press enter to open Control Panel. Or else, you can type appwiz.cpl to open Add or Remove Programs utility directly.

Step 2: Once you are there in the utility, scroll down and locate the MS Office Suite and shown below and click on Change option.


Step 3: In the next window, select Add or Remove features and click on Continue.


Step 4: In the next window, expand Office Tools in the Installation Options.


Step 5: Then, expand Microsoft Office Document Imaging option.


Step 6: Now, click on the Scanning, OCR and Indexing Service Filter and choose Run from My Computer option. Click on Continue.


Step 7: System will configure itself and give you a success notification.


That’s it!

Once this is done, you can find Microsoft Office Document Image Writer option in the list of Printers installed in your computer.


Let me know if this helps, so that I would know. If you need anything else, do let me know that too.

See you next time; till then, keep fit and have fun with codes, windows and your computer!


And yes, Happy Valentine's Day!
Posted in Labels: , , | 0 Comments »

How to open MDI Files in Microsoft Office 2007

Wednesday, December 22, 2010 by Tan
Today, when I tried to open a file with the extension .MDI, I could not open it and could not find a software application in my computer which would open it. I searched a long and finally I got to know what I had to do. Let me share with you here and tell you how you can open files with .MDI extension in a computer running Microsoft Office 2007.

What is a MDI file? MDI stands for Microsoft Document Imaging, which is a proprietary image format from Microsoft. Scanned images are stored using this format. One needs to have Microsoft Office Document Imaging installed in the computer to open and view files with MDI extension. This is an application that comes along with the MS Office suit.

The issue with this application is that it gets installed automatically along with Microsoft Office 2003 suit; however, the same is not true with the later versions of the software. My problem was that the file I wanted to view was created in a computer running MS Office 2003 and I am running MS Office 2007 in my computer. Hence, to open MDI Files in Microsoft Office 2007, I had to install that application in my computer. Once done, it opened smooth and I could print!

Let me tell you how you can install Microsoft Office Document Imaging in your computer, running on MS Office 2007. The steps are simple, but most users would find it little difficult since there are some steps involved in that. Hope I can explain the steps better here.

Operating System: MS XP
Office version: 2007


To view MDI Files in Microsoft Office 2007 we need to first install the application.
To do so follow the steps below:
1. Click on Start.
2. Click on Control Panel.
3. Double Click the Add or remove programs icon.
Alternately, type appwiz.cpl in Start > Run and hit Enter.
4. As the dialog box comes up, select Microsoft Office 2007 (as per the version installed in your computer).
5. Click on Change button.

6. You will get a dialog box from MS Office asking you to either add or remove features, repair and uninstall (may not be present in all computers).
7. Choose Add or Remove features option, and click Continue.

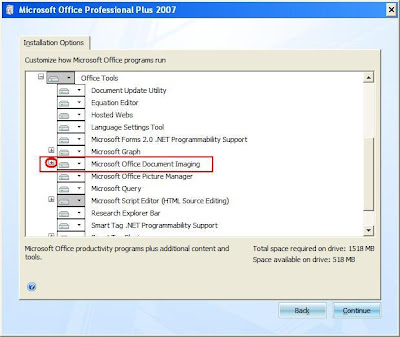
8. In the next screen expand Office Tools, by clicking on the small plus sign. 
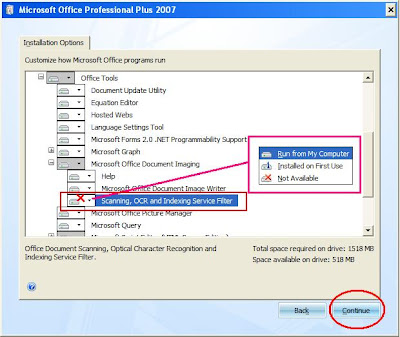
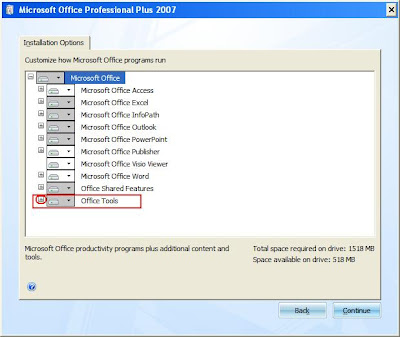
9. Similarly, expand Microsoft Office Document Imaging option, inside Office Tools.


10. Now, choose Scanning, OCR, and Indexing Services Filter, and then click on the small down arrow.
11. Select Run from My Computer option and click on Continue.


This will start configuring your computer and installing the application and you will see a screen like this:

This ends the installation.


Now, to check whether the installation was successful, try printing any document. You will find an additional item named, ‘Microsoft Office Document Image Writer’ as a virtual printer installed along with the pre-installed printers in your computer. This confirms that the application is installed and now you can print any document and save it with .MDI extension. On top of that, you may now open any MDI files sent to you from any other computer.


This thing is very helpful, when you collect documents from the internet and want to print it later. Also, you may use this when you want to move a document to another computer before you would like to print. This will save you some time and would result in a nice printing solution. Now you know how to open MDI Files in Microsoft Office 2007 and you need not run around searching for computers or applications that can open and MDI file.

For a detailed article on MDI file formats and the above steps in computers with other versions of MS Office, please see this web document from Microsoft.

Hope you liked this post. We appreciate your comments. Please feel free and let us know if this was helpful. Merry Christmas. Enjoy!

Posted in Labels: , | 0 Comments »

Welcome to Microsoft Office Applications.

Wednesday, March 3, 2010 by Tan
Welcome. Microsoft Office includes a wide range of Applications that can be used for a wide range of activities required in your daily life or at work. There are many office tools available to an user – few that are free and lots that are not; however, MS Office has grown and maintained their usage and popularity among users all over the world.

Well, this blog is not an agency to promote MS Office in any way, but to re-iterate, we will be talking about codes and scripting which would find their extensive use in these office applications. So, why not start with a small introduction to the same. This is where the codes we discuss in the blog will find their use. Most of the readers of The Code Point would know about MS Office and its basic applications. We can assume it correctly as because if the user have not used it earlier, he would not find the need of searching for codes that are required in these applications. Anyways!

Microsoft Office comes with an online resource of free training which talks about basics of these Office Apps and shows a way to the reader where he can walk on. I have myself used these tutorials many a times, while using MS Word 2003 and MS Excel 2003 and more now, when we are working on MS Office 2007. Feel free to visit the following web link and go through the various free training courses. These courses are self paced and talks about almost all necessary amendments and dissimilarities of an old and new version of MS Office App.


Note: If you want something more in those training courses apart from what is listed in the front page, please use the ‘Search Training’ tool at the top of the page.

Well, I was going through a lesson sometime ago and I really loved the way they told about ‘Nested Loops’ used in VBA. Check the following:

Do While (Earth Revolves around the Sun)
    Do While (Earth Rotates around its axis)
        If (Facing Sun) Then
            Day
        Else
            Night
        End If
    Loop
Loop
Quote: OK, so the code above wouldn't actually run in Excel, but it illustrates that for each big loop (around the sun) there are 365 smaller loops (around Earth's axis).

How easy to understand and simple is that? I just loved it. Teaching has to be thus. Simple, easy and to the point! This is the reason I would recommend the reader to go through the material there in free time (even if you consider yourself to be advanced and have no time) and I am sure you will see things that might have missed your eyes!

Best of Luck!
Posted in Labels: , , | 0 Comments »